
The installation of indoor playground equipment is a critical stage in any commercial playground project. Even the highest-quality equipment can fail to perform as intended if it is not installed correctly. For schools, shopping malls, family entertainment centers, and indoor parks, a professional installation process ensures safety, durability, and long-term operational efficiency.
Based on our experience working with commercial indoor playground projects in Europe and North America, this article explains the indoor playground equipment installation process step by step, helping buyers and project managers understand what to expect and how to prepare.
Why Proper Installation Matters for Indoor Playground Equipment
Indoor playground equipment is designed for high-frequency use in controlled environments. Improper installation can lead to:
- Increased safety risks
- Structural instability
- Faster wear and tear
- Difficulty passing safety inspections
A well-managed installation process, on the other hand, ensures that the equipment performs according to design specifications and complies with applicable safety standards.
Overview of the Indoor Playground Equipment Installation Process
The installation process typically includes the following stages:
- Pre-installation planning
- Site preparation
- Equipment delivery and inspection
- Structural frame installation
- Play components and accessories installation
- Safety surfacing installation
- Final inspection and handover
Each stage plays a specific role in ensuring a safe and reliable indoor playground.
Step 1: Pre-Installation Planning
Site Assessment and Measurements
Before installation begins, accurate site measurements are essential. This includes:
- Floor dimensions
- Ceiling height
- Column locations
- Emergency exits and access routes
Professional manufacturers usually provide layout drawings based on these measurements to ensure the equipment fits the space precisely.
Installation Schedule Coordination
Installation planning also involves coordinating timelines with other on-site activities such as flooring installation, electrical work, and interior decoration. Clear scheduling helps prevent delays and conflicts.
Step 2: Site Preparation
Proper site preparation creates the foundation for a smooth installation process.
Key preparation tasks include:
- Ensuring a level and load-bearing floor
- Completing all ceiling and wall finishes
- Confirming power supply for lighting or interactive elements
The installation area should be clean and free of obstacles before equipment arrives.
Step 3: Equipment Delivery and Inspection
Delivery Coordination
Indoor playground equipment is typically delivered in multiple packages containing structural components, play elements, fasteners, and accessories. Coordinated delivery helps avoid congestion and material loss.
On-Site Inspection
Before installation, all components should be inspected to ensure:
- No damage occurred during transportation
- All parts match the packing list
- Materials and finishes meet specifications
Early inspection helps resolve issues before installation begins.
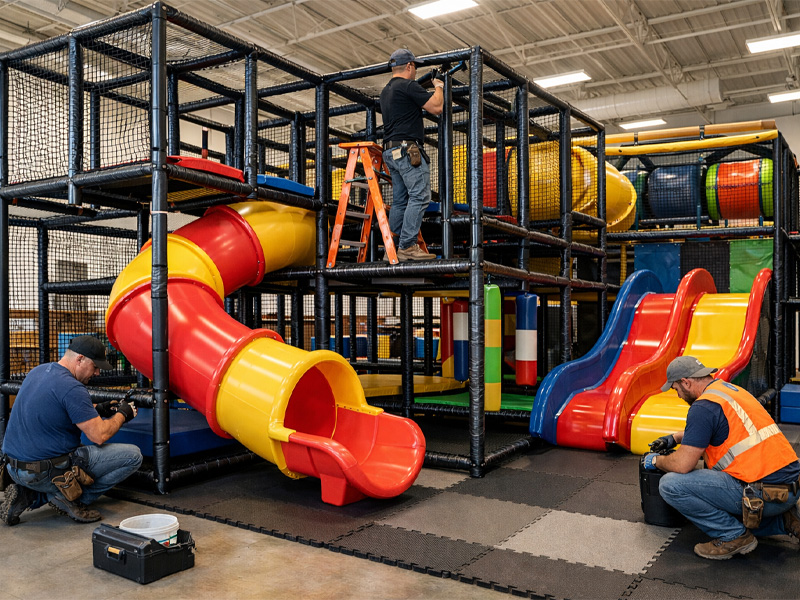
Step 4: Structural Frame Installation
The structural frame forms the backbone of the indoor playground.
Frame Assembly
Steel pipes or frames are assembled according to technical drawings. These structures are designed to:
- Support dynamic loads
- Maintain stability under heavy use
- Allow modular expansion if required
All connections are secured using specified fasteners to ensure structural integrity.
Anchoring and Alignment
The frame is anchored to the floor and aligned vertically and horizontally. Accurate alignment is essential for the correct installation of subsequent components.
Step 5: Installation of Play Components
Once the main structure is in place, play elements are installed.
Platforms and Decks
Platforms are installed at designated heights and secured firmly to the frame. Anti-slip surfaces are used to enhance safety.
Slides, Tunnels, and Climbing Elements
Slides, tunnels, rope nets, and climbing features are attached according to design specifications. Proper spacing and clearance are maintained to prevent collisions and entrapment risks.
Step 6: Soft Padding and Safety Protection
Safety padding is a defining feature of indoor playground equipment.
Foam Padding Installation
All steel frames are covered with high-density foam padding to absorb impact. Padding thickness and coverage are designed to meet safety requirements.
Protective Netting
Safety netting is installed around elevated play areas to prevent falls while maintaining visibility for supervision.
Step 7: Safety Surfacing Installation
The flooring system is a critical safety component.
Common indoor playground flooring options include:
- EVA foam mats
- Rubber flooring
- Carpet with padding
Impact-absorbing flooring helps reduce injury risk from falls and supports compliance with safety standards.
Step 8: Quality Control and Safety Inspection
Before opening the playground, a comprehensive inspection is conducted.
Functional Testing
Installers test:
- Structural stability
- Secure fastening of components
- Smooth operation of slides and moving parts
Safety Compliance Check
The playground is reviewed against applicable standards such as EN 1176 or ASTM F1918, depending on the project location.
Step 9: Cleaning and Project Handover
After installation and inspection, the playground is cleaned and prepared for use.
The handover process typically includes:
- Final walkthrough with the client
- Maintenance and inspection guidelines
- Documentation and warranty information
Clear handover ensures smooth operation from day one.
Installation Timeframe and Influencing Factors
The installation timeline depends on several factors:
- Playground size and complexity
- Degree of customization
- Site readiness
On average, a medium-sized commercial indoor playground can be installed within one to two weeks by an experienced installation team.
Common Installation Challenges and How to Avoid Them
Typical challenges include:
- Inaccurate site measurements
- Incomplete site preparation
- Lack of coordination between trades
Working with experienced manufacturers and installers helps minimize these risks.
Maintenance Considerations After Installation
Installation is only the beginning of the playground’s lifecycle. Regular maintenance includes:
- Visual inspections
- Tightening fasteners
- Cleaning surfaces and padding
Proper maintenance extends equipment lifespan and preserves safety performance.
Real-World Installation Experience
In our experience with commercial indoor playground installations, projects succeed when:
- Installation follows detailed technical drawings
- Safety checks are conducted systematically
- Clients receive clear maintenance guidance
These practices result in reliable, long-lasting indoor playgrounds.
How to Choose a Professional Indoor Playground Equipment Installer
When selecting an installation partner, look for:
- Experience with commercial indoor playground projects
- Familiarity with international safety standards
- Clear installation procedures and documentation
Professional installation teams add significant value to the overall project outcome.
Conclusion
Understanding the indoor playground equipment installation process helps buyers, operators, and project managers plan more effectively and avoid costly mistakes. With proper preparation, professional installation, and thorough inspection, indoor playgrounds can deliver safe and engaging play experiences for many years.

